WDT Tool: The Ultimate Guide to Perfect Espresso Shots & How to Avoid Common Mistakes
The Secret Champion of Espresso: How an Espresso WDT Tool is Your Key to Consistency Shots
For the coffee connoisseur, the journey is usually a watchful attention to beans, grinders, and machine adjustment. But there is one humble, yet profoundly powerful, practice that tends to be overlooked by beginners and becomes an automatic ritual for master baristas: the Weiss Distribution Technique (WDT). And its requisite companion? A dedicated WDT tool.
If you’ve ever been left scratching your head over why your shots of espresso may be inconsistent at times – a little sour in one area, a little bitter in another – or why water seems to pass through some area of your coffee puck, then the answer may lie with uneven coffee distribution. That’s precisely where the WDT tool steps in, transforming your espresso experience with shocking simplicity.
The Unseen Obstacle: Why Your Espresso Might Be Falling Short
Even the most precise grinders, especially those calibrated to espresso’s heavy texture, are likely to produce grounds that clump. Such clumps, along with the inherent differences in ground density, lead to a big problem in your portafilter basket.
This issue is called channeling. When you pour high-pressure hot water on an imbalanced coffee bed, the water, being the lazy type, will always follow the path of least resistance. It rushes through the parts where the coffee is less dense, or where clumping has left tiny pockets. This leads to:
- Under-extraction in the dense or clumpy areas (water can’t penetrate completely).
- Over-extraction in channeling zones (water moves too quickly).
The result? A shot that’s an asymmetrical symphony of sour and bitter flavors, a poor crema, and a disorganized flow that confuses you. Enter the humble yet powerful Weiss Distribution Technique here.
The Magic Behind the WDT: Unveiling the Benefits
The genius of the WDT tool is that it shatters these millimetric clumps and homogenizes the coffee grounds before tamping. This small step may look minor, but it creates a series of dramatic benefits for your espresso:
- Improved Consistency of Extraction: With each coffee particle evenly distributed, water flows consistently across the whole puck. That is, all of the coffee contributes equally to the final taste.
- Eliminates Channeling: This is the greatest benefit. An even coffee bed offers consistent resistance to the water, preventing those preferential flow channels that ruin shots.
- Better Tasting Espresso: The ultimate prize! With even extraction, your espresso tastes more balanced, sweeter, less bitter or sour, really expressing the full flavor of your beans.
- Better Shot Repeatability: Once you’ve mastered the WDT, you’ll discover repeating shots of identical high quality to be much simpler to do consecutively. It provides that confidence and saves the coffee waste.
- An Inexpensive Upgrade: Rather than paying money for a new machine or grinder, a WDT tool is extremely low-cost. It’s also considered to be one of the best and cheapest ways for home baristas to enhance espresso quality.
- More Consistent and Stable Crema: A shot that is consistently extracted tends to result in a more elegant, consistent, and stable crema layer, which is a visual clue to a great-pulled shot.
Ready to choose your secret weapon?
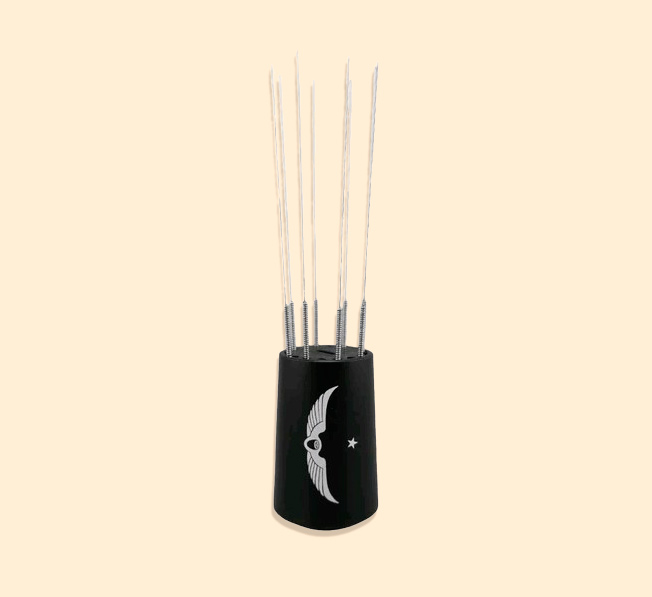
While many options exist, we’ve found the Sworksdesigns WDT Tool to be an outstanding choice for home baristas seeking consistency and quality. With its precision-engineered, ultra-thin needles and durable design, it embodies everything you need to transform your espresso.
Choosing Your Weapon: What Makes a Great WDT Tool
While in theory you could perhaps use a paperclip straightened out, it’s better to have a dedicated tool for the task. Below are things to look at when choosing your tool of espresso greatness:
- Needle Thickness (Most Important!): This is the most important parameter. The needles should be very thin, ideally 0.3mm to 0.4mm. Thin needles are crucial because they can effectively break up clumps and redistribute grounds without drawing large quantities of coffee with them or opening new channels themselves. Thicker probes exacerbate distribution because they can only move clumps around, not break them.
- Number of Needles: Multi-needle devices (5-8 or more) will usually give better and more thorough distribution across the entire coffee bed, covering more area with each stir.
- Needle Length: Have the needles long enough to reach down to the bottom of your deepest portafilter basket. There is adjustable needle length available on some devices, offering more flexibility.
- Needle Material: High-quality, food-grade stainless steel. Rustproof, long-lasting, and safe for food contact.
- Handle/Holder: Ergonomic shape for effortless handling, and a magnetic stand or a stable base for effortless, tidy storage on your coffee station.
The Technique: How to Do the Weiss Distribution Right
Once you have your WDT tool, the process is strangely simple, but it has to be done carefully.
- Grind into Basket: Simply pour your freshly ground coffee directly into your portafilter basket.
- Gentle Stirring: Begin to stir the grounds gently using your WDT tool. The concept is to move the needles in such a way that clumps are broken up and the coffee is spread out evenly.
- Bottom-to-Top Movement: Ensure that you reach the bottom of the basket with your needles and then work your way back up through the coffee. This motion helps to lift and redistribute grounds all the way from the puck’s bottom.
- Cover All Areas: Sweep the tool right across the surface of the coffee bed, using various patterns like spirals, concentric circles, or figure-eights, until the coffee appears evenly fluffy and lump-free.
- Avoid Compacting: Don’t press or compact the coffee. Your hand must be light.
- Pre-Tamp Step: All of this is accomplished before any tamping. or leveling of the coffee. After WDT, you will usually use a leveling tool or light tap, followed by your tamper.
Sworksdesigns WDT Tool: Your Key to Unlocking Perfect Espresso
- Ideal Needle Thickness: Engineered with ultra-thin needles (ideally 0.3-0.4mm) that effectively break up clumps without creating new channels.
- Premium Materials: Crafted from durable, food-grade stainless steel for longevity and safe contact with your coffee.
- Ergonomic Design: Features a comfortable handle and thoughtful construction for effortless use and precise control.
- Superior Distribution: Designed for maximum coverage of the coffee puck, ensuring consistently even extraction with every shot.
- Elegant & Tidy Storage: Its sleek design, often with a convenient stand, makes it a stylish and practical addition to your coffee station.
Beyond the Basics: Avoid WDT Traps for Flawless Espresso
As spectacular as the Weiss Distribution Technique is, its temperamental nature means that minor technical errors can unknowingly make its benefit irrelevant. For the serious hobbyist who will do anything to coax the best espresso possible, learning how to avoid WDT traps is just as critical as learning how to perform the technique itself. Even with the right tool, a flawed execution can lead to disappointing inconsistency.
These are a few of the most common barista mistakes using their WDT tool, and how to ensure that your efforts actually result in a perfect shot:
1. The “Too-Thick” Tool Trap
The entire idea of WDT is premised on very thin needles that are able to cut through clusters of grounds without disturbing the overall configuration of the bed of coffee excessively. One possible error, especially with domestic brew or less sophisticated equipment, is the use of needles that are too large (anything much larger than 0.4mm).
- Why it’s a bad idea: Bigger needles are likely to move clumps and grounds about rather than effectively cracking them. This can, in turn, unintentionally create new, larger channels or regions of uneven density, effectively defeating the very purpose of WDT and inviting channeling rather than discouraging it.
- How to avoid it: Always select a super-skinny needle tool (0.3mm to 0.4mm is best) specifically designed for this job.
2. Compacting, Not Distributing
WDT is not pre-tamping, but de-clumping and fluffing. The error of tamping the coffee grounds down with the WDT tool while stirring is common.
- Why it’s a bad idea: Downward pressure compresses the grounds, trapping air or creating dense clumps too soon. This creates uneven extraction because water will still find ways around these denser areas during the shot.
- How to avoid: Employ a light, smooth touch. The motion should be more of stirring and scooping the grounds, creating an airy, even bed before even thinking about tamping.
3. The Superficial Stir
Some users may simply stir the surface of coffee grounds without reaching the bottom of the basket.
- Why it’s wrong: Clumps and blemishes may occur throughout the dose, especially towards the end of the portafilter basket where grounds first make contact. When you ignore these lower layers, you’re leaving possible channels unaddressed, and that creates uneven extraction even with surface-level attention.
- How to avoid: Leave your needles on your WDT tool extended enough to reach all the way to the bottom of your portafilter basket. Maintain an extended, bottom-to-top stirring motion that activates the full amount of your coffee.
4. Over-Aggression or Excessive Stirring
While thoroughness is a good thing, over-aggression or over-stirring is a bad thing.
- Why it’s wrong: Too much agitation can generate static buildup, enabling grounds to adhere to the tool or the basket wall. It can also lead to “fines migration,” where very fine particles float to the bottom of the basket and perhaps create a dense layer that inhibits even flow. A bed too fluffed up can be hard to tamp out evenly too.
- How to avoid: Be efficient. When the grounds look evenly fluffed and clump-free, leave it alone. The process should be rapid and intentional, not extended.
5. Incomplete Coverage
Occasionally, in haste, users may not carefully cover the entire surface area of the coffee bed, leaving areas untouched.
- Why it’s a mistake: Any unscoured or unevenly distributed area may still contain clumps or density variations, offering a possible channeling path.
- How to avoid: Use a systematic technique (e.g., spiral inward/outward, circular motion around outer and inner areas) so that every area of the coffee bed has been stirred and smoothed out carefully.
6. Failure to Clean Tools
A very minor thing, but a dirty WDT tool can make a difference in your preparation.
- Why it’s a mistake: Old coffee oils or dried grounds on the needles can impede easy flow through the new coffee, or even impart stale flavors to your dose.
- How to avoid: Clean your WDT tool immediately after each use so its needles are clean and ready for optimal performance.
By remembering these common errors, you can be sure your WDT ritual always contributes to the well-balanced extraction and delicious flavor you want in every shot of espresso.
Conclusion: Elevate Your Espresso Game Today
The Weiss Distribution Technique, performed by a well-chosen WDT tool, is an elementary process that has the potential to make a big impact in terms of the quality and uniformity of your espresso shots. It’s proof of how small, careful movements can make a gigantic difference in the final cup.
If you care about your espresso and want to pull more consistently delicious shots, embracing the WDT is a extremely cost-effective and highly urged upgrade. Add this simple ritual to your workflow, and prepare to unlock a whole new level of taste and consistency in your home barista experience.
FAQs
What is an espresso WDT tool?
A WDT tool is an instrument typically consisting of a handle with some thin wires or needles, used to spread coffee grounds evenly in a portafilter basket before tamping.
Why do they refer to it as WDT?
They refer to it as WDT because it’s the acronym for the Weiss Distribution Technique.
What is WDT abbreviated as?
WDT is abbreviated for Weiss Distribution Technique.
Do I need to use a WDT tool?
Yes, you can utilize a WDT tool if you want to significantly improve your espresso shot consistency, reduce channeling, and achieve more flavorful, balanced espresso. It’s among the most cost-effective home barista upgrades.
How to choose a WDT tool?
When choosing a WDT tool, consider:
- Needle Thickness: First and foremost, needles must be very thin (ideally 0.3mm to 0.4mm) in order to shatter clumps without scraping grounds.
- Number of Needles: Multiple needles (5-8+) in the tools provide more effective distribution.
- Needle Length: Make sure to have needles long enough to extend to the bottom of your portafilter basket.
- Material: Use food-grade stainless steel needles.
- Ergonomics: A comfortable handle and secure base are advisable.
Who created the WDT tool?
The Weiss Distribution Technique or WDT was developed by John Weiss.
How to use a WDT?
To use a WDT tool:
- When you’ve ground the coffee into your portafilter, use the tool to stir the grounds softly.
- Take the needles from the bottom upwards through the bed of coffee, ensuring to make it down to the bottom of the basket.
- Moisten all basket surfaces (e.g., in spiral or circular directions) to break up clumps and evenly distribute grounds.
- Perform this before leveling and tamping and refrain from pressing down on the coffee.